Pita bread
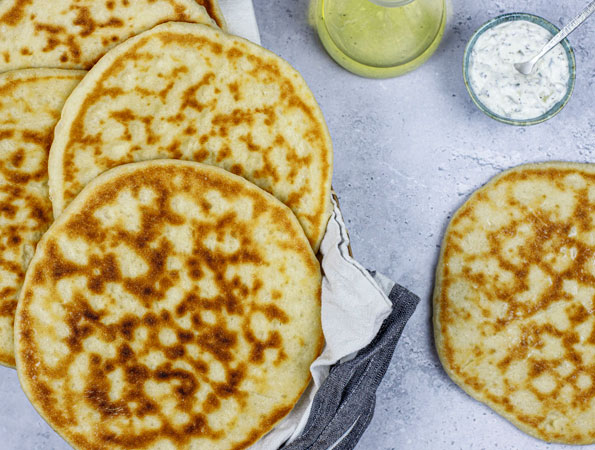
These light and fluffy flatbreads are great for serving with dips, stews and as the base for delicious grilled souvlaki.
Difficulty
Low
Time
135 min
Author
Kenwood
This recipe is prepared with:
Products
Chef XL KVL4100W
Ingredients
Servings
6
Makes
6 breads
160 g water, lukewarm
200 g whole milk, lukewarm
2 Tbsp extra virgin olive oil
1 tsp granulated sugar
2 tsp active dried yeast
530 g strong white bread flour
1 tsp fine sea salt
olive oil, as needed
Utensils
Bowl large, Frying pan, KVL4100W, KVL65.001WH, KMX751AWH, KMX751ARD, KMX751ACR, KMX751ABK, Dough Tool
Instructions
Before starting
Soft, warm and with that satisfying pocket in the middle, homemade pita bread is one of the most rewarding things you can bake, and it takes no more than staple ingredients found in the everyday cupboard. This simple flatbread is endlessly versatile once it comes out of the oven: perfect for stuffing, tearing to scoop up a bowl of houmous, or splitting open for a quick sandwich. This dough has a high hydration so it will be sticky to handle, so ensure you have floured your hands and work surface well. The increased hydration ensures a soft chewy pitta bread. A wetter dough is exactly what gives pita its soft, chewy crumb and helps create that all-important pocket, so resist the temptation to add extra flour just to make the dough easier to handle. If you have a pizza stone, preheat it in the oven for the best result. This recipe, however, uses a baking tray, which should be preheated before placing the dough on it. A preheated surface helps the pita puff up and form its characteristic pocket. With a Kenwood stand mixer taking care of the kneading, achieving a smooth, elastic dough is straightforward even if you have never made bread before. Best served freshly baked, these pitas are ideal for filling with homemade houmous, salad, grilled vegetables or your favourite protein.
Step 1
How to make pita bread dough
Fit the dough hook to your Kenwood stand mixer. Add the lukewarm water and caster sugar to the bowl, then sprinkle over the active dried yeast. Stir briefly and leave to stand for 5–10 minutes, until the mixture looks slightly foamy. Add the plain flour and salt, then knead with the splashguard fitted for 8 minutes on speed 1, until the dough is smooth, elastic and slightly sticky. Kneading develops the gluten network that traps the gas produced by the yeast, helping the pita expand and form its characteristic pocket during baking, so allow the mixer to complete the full kneading time. Remove the dough hook, cover the bowl with the splashguard and leave the dough to prove in a warm, draught-free place for 1 hour 30 minutes, or until doubled in size. When handling the dough, use only as much extra flour as necessary: a well-hydrated, slightly sticky dough produces softer, chewier pita than an over-floured one.
Step 2
Shaping the pita breads
Once risen, transfer the dough to a lightly floured surface and gather it into a ball, tucking the edges under. Cut into 8 equal pieces and roll each one into a smooth ball, dusting lightly with plain flour. Cover loosely with plastic wrap and let rest for 10 minutes, then roll each ball out into a circle. Roll with a light, even hand rather than pressing down hard: a gentle touch keeps the air bubbles that formed during proving intact, and it's this trapped air that will later turn to steam and puff the pitta in the oven. If a circle of dough springs back as you roll it, leave it to rest for a minute or two before continuing rather than forcing it: this gives the gluten time to relax, so you can roll it out into an even, thin round without it tearing.
Step 3
How to cook pita bread in the oven
Preheat the oven to 260°C, or at your oven’s highest setting, and place a clean baking tray inside to heat up. Quickly place 2 pittas onto the hot tray at a time, making sure they are completely flat, and bake for 4 minutes. Remove from the oven and leave to cool on a rack before repeating with the rest. The puff itself comes down to steam: as the thin, well-hydrated dough hits such intense heat, the moisture inside turns instantly to steam, and because the surface seals almost immediately, that steam has only one way to go, pushing the two layers of dough apart into a pocket. If your pittas come out flat rather than puffed, it is nearly always because the oven or tray wasn't hot enough, or the dough was rolled a little too thick, rather than any fault in the recipe itself.
Tips
Tips for soft homemade pita bread
Once all of the pittas are baked, place them into a plastic bag. The little bit of steam keeps the pitta bread soft and moist. Homemade pita is at its best eaten warm on the day it's baked, but leftovers keep well too: once completely cool, store them in an airtight bag or container at room temperature for two to three days, or freeze for up to three months. To warm pita bread back up, a few minutes in a hot oven or a dry frying pan works far better than the microwave, which tends to leave it chewy rather than soft. If you'd rather skip the yeast altogether, a quick no-yeast flatbread made with just flour, yogurt and a raising agent is a handy stand-in, though it won't puff into quite the same pocket as this yeasted version.
You can also prepare this recipe* with:
Products
kMix Pure White Stand Mixer KMX751AWH
kMix Calm Cream Stand Mixer KMX751ACR
kMix Sleek Black Stand Mixer KMX751ABK

Delivery
Delivery within 1-3 business days

Money Back Guarantee
30-day return policy

Payments
Secure payments
Delivery
Delivery within 1-3 business days
Money Back Guarantee
30-day return policy
Payments
Secure payments
Want to mix with us?
Our newsletter gives you recipes, tricks, promotions and more.